Buyer Portal v1.5.0: Report Release
Billed Budget Report 
You can export Billed Budget Data directly to excel. The Report can be run 3 different ways:
- Detail – The data will be sorted by Item, Period, and Week
- Summary – The data will be sorted by Item
- State – The data will be grouped and subtotaled by State and then sorted by Item
In addition, the data can be filtered by Costco vs. ALL Vendors, Date, P.O. Number, Vendor, Item, State, and Location. The output in Excel shows all of the data for the Events billed to Accounts associated with your Division(s) and Department(s) including Labor, Samples, Enhancements, Coupons, Supplies, Sales Tax, and Labor Tax. Each line item is totaled and also includes the Average Units Purchased per Event, Average Sample Cost (without Coupons), and Average Total Event Cost. Each Split or Combo Item will be listed on its own line so as to keep the Cost and Averages separate per Item. For Split Items in other Departments, you will ONLY see your own Items, but there is a column that will list any other Items that ran with your Item. 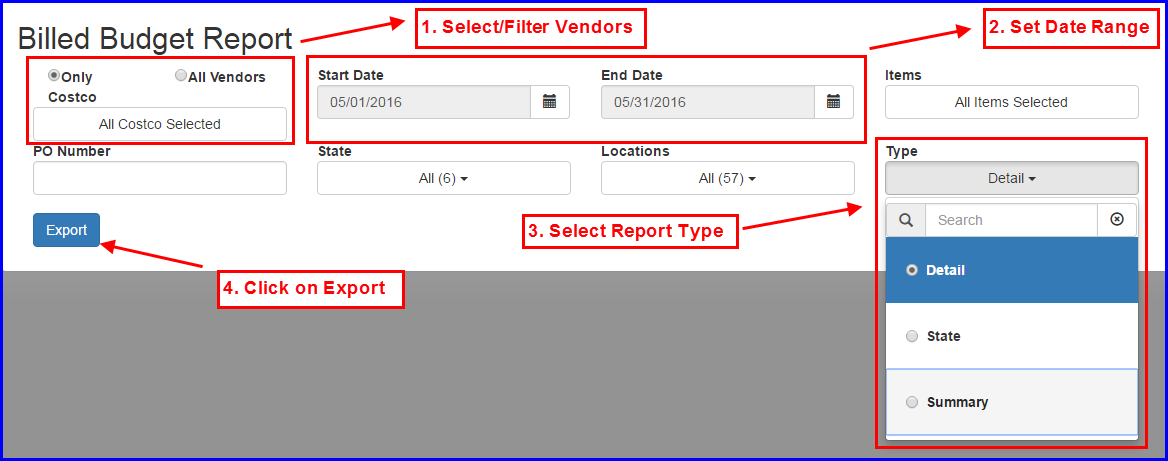
Division Schedule Report
You can export the Division Schedule Report directly to excel. The Report will show a count of all Product Demonstration (PD) and Other (Roadshow, Special Events, and Vendor Performed Demos) Events for every Location in the Division per day. The Report will automatically be filtered to your Division(s) and Department(s). However, the Division Schedule can be for ALL Departments so that you can get an idea of the overall Schedule for your Division. You must also select a Date Range and Threshold. The Threshold is a numeric value you can set to help you understand what Locations/Dates have too few Product Demonstrations scheduled. Any number less than the Threshold will be highlighted in blue in the report. 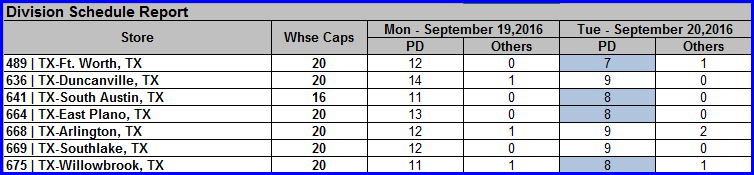
Department Schedule Report
You can export the Department Schedule Report directly to excel. The Report will show you every Item scheduled on a separate line in Excel. The data includes (but is not limited to) Event Date, Vendor, Item, Event Type, Split/Combo Items, Line of Business, Comments, Services, List of Stores where the Event is running, and Store Count. The Report also includes Vendor Scheduled Events which will look a little different in the Report as much of the data will be missing. The Report will automatically be filtered to your Division(s) and Department(s). You must then select a Date Range in order to run the Report. You can also filter the Report by Location. Each Split or Combo Item will be listed on its own line. There is a column to show what other Items the Item ran with. 
Saving Calendar Filters
We received a lot of feedback, particularly from the ICSs, about the need to save and apply different filters in the Calendar to quickly get to the information you need to see quickly. You can now create and save custom filters for yourself in the Calendar so that you can always pull up the group of Vendors you are responsible for or see ONLY the Items that Costco will be paying for, etc. You can also set one of your saved filters to be your default filter when the Calendar opens if it is more helpful to you than the regular filter by Division(s) and Department(s).
Creating a new Wildcard Filter
- For this example, let’s say you are responsible for all Vendors that begin with the letters A – F.
- Open the Buyer Calendar
- Click on the Create Filter button next to the Print button in the top right of the Calendar.
- This will open a popup where you can enter the Name of the filter (use something short and recognizable. If you make the name too long (say longer than the width of your phone screen), the filter may not render on your phone every nicely. I am going to name this Filter “My Vendors”
- The remaining Filters should already be familiar to you. You can filter by Division(s) and Department(s). Your default Division(s) and Department(s) will be pre-selected for you. You can also filter by Event Type, Location.
- Filtering by Vendor is where things are a little different. If you remember how the Calendar currently works, the Calendar is a 3 week snapshot in time where the list of Vendor is driven by the Events Scheduled for the time period you have selected. We wanted you to be able to create Filters that you could use for ANY time period, so we have added a Wildcard search. Let me explain the differences. If I wanted to select all Vendors that start with the letter “A”, I would have to select ~323 Vendors.

- In addition, if a new Vendor was added the next day that started with the letter “A”, it would NOT be included in the Filter I created. Similarly, if I were to change the Calendar date back in time, the list of Vendors starting with the letter “A” would be different as the list of Events that drive the list of Vendors would be different.
- To get around this, we have added a Wildcard search. A Wildcard search is added with an Apostrophe which indicates that ALL records should be included where there is a match for the characters to the left of the Apostrophe regardless of whatever characters are to the right of the Apostrophe. For example, the search A* would return ALL Vendors that start with the letter “A” Gen* would return records such as “General Mills” as well as “Genisoy Food Co.”
- Getting back to the original intent to create a filter for ALL Vendors that start with letters A – F, in the Vendor search field, type in A*
- You will see an option to either select ALL Vendors below, or select A*. Click on Select A* and the criteria will be moved to the Selected Vendor section to the right.
- Repeat this for each letter up to F*

- Click on the Save Button in the bottom right hand corner.
- You will be returned to the Calendar and your Filter will be shown in a row below the regular filters (Dates, Division(s), Department(s), etc.) as a blue button.
Adding/Removing Vendors and Items from a Filter
Besides Wildcard Filters which are described above, you can use any combination of Divisions, Departments, Locations, Event Types, Vendors and Items when created a Saved Filter. You are already familiar with the controls used for filtering Departments Divisions, Locations, and Event Types, so this section will focus on how to use the Vendor and Item filters.
- For this example, let’s say you want to create a Filter for all Yoplait Items offered by General Mills.
- Open the Buyer Calendar
- Click on the Create Filter button next to the Print button in the top right of the Calendar.
- This will open a popup where you can enter your filter parameters. Start by typing just “Gen” in the Vendor field. This works like the regular filters on the Calendar in that it will return ALL Vendors that have “Gen” anywhere in their name so it is pulling not just General Mills, but 5 Generation Bakers, Convergence Marketing, etc. which you can see in the screenshot below.
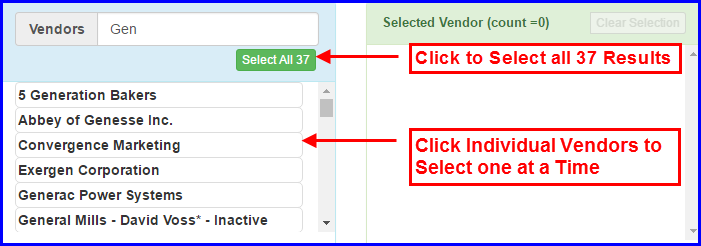
- You can either click on the General Mills Vendors one at a time to move them over to the Selected Vendor area to the right or click on the green Select All 37 button (not recommended since you ONLY want General Mills) or refine your search further by typing in “General Mills”
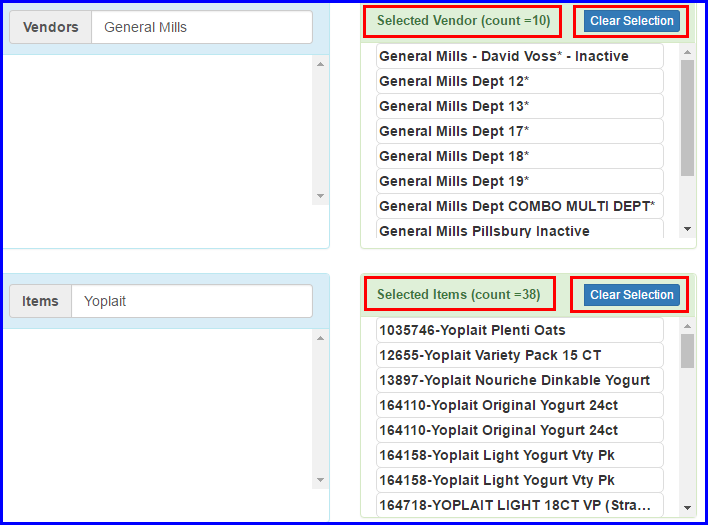
- Once you refine your search to “General Mills” you will see only 10 General Mills Vendors and you can click on the Select All button to move all 10 General Mills Vendors in to the Selected Vendor section to the right.
- The Items filter works similarly to the Items filter that you have already used before on the Calendar in that the list of Items will be driven by the Vendor Selection. Now that we have filtered the Vendors on General Mills, the Items remaining in the Item list are ONLY General Mills Items. In the Item Search, type in “Yoplait” This will filter ALL Items with Yoplait in the description which is good in this case because it will get both “Yoplait Variety Pack..” as well as “General Mills Yoplait Yogurt…”

- The same options exist for Items as exist for Vendors. You can either click on Items one at a time to move them over to the Selected Items area to the right, you can click on the green Select All button, or you can refine your search by typing more information in to the Search Items field.
- In this case, we will move over all of the Yoplait Items. Once you have done this, your Vendors and Items will all be moved to the right in the Selected Vendors/Items section. You will also see the total count for each.
- To remove Vendors or Items, you perform the opposite action. You can either click on Vendors/Items one by one to move them back to the area on the left or you can click on the blue Clear Selection button to remove either ALL Vendors or ALL Items depending on which button you select.
- Once you are done, click on the Save button at the bottom. You will be returned to the Calendar and the new Saved Filter you just created will be available to use.
Applying a Saved Filter in the Calendar 
Applying a Saved Filter from the Calendar can be done both on your Computer and your Mobile Devices (Creating/Editing Filters can ONLY be done on your computer based on the size and complexity of the popup).
- To apply a Saved Filter, first open the Calendar.
- If you want to change your Start Date, change it BEFORE you apply your filter. If you remember, changing the Start Date resets your filter so if you apply your filter first, when you change the Start Date, your filter will be removed.
- Tap/Click in the Filter that you want to apply. The Applied Filter will be green instead of blue.
- The Calendar will be updated with the Applied Filter
Computer View 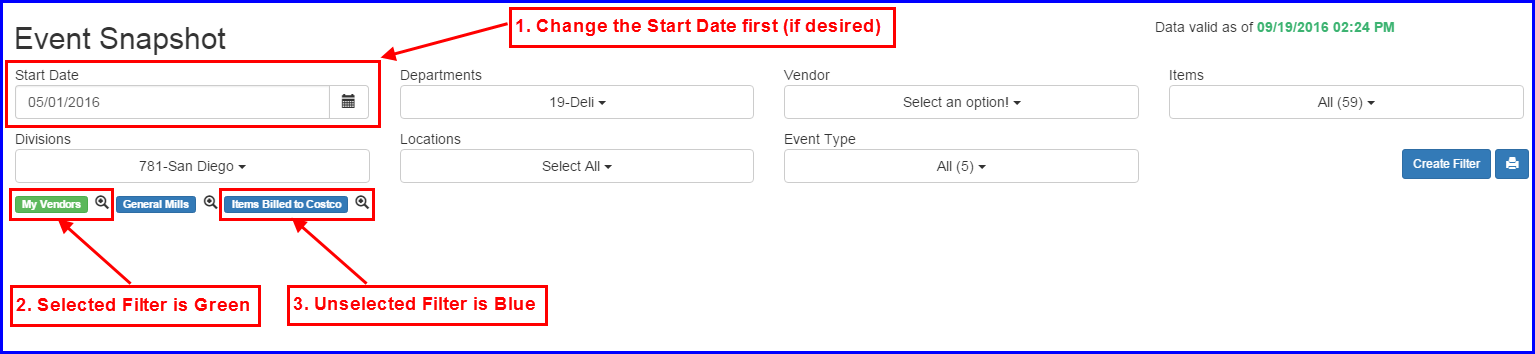 Mobile View

Setting the Default Filter
The current Default Filter for the Calendar is based on what Division(s) and Department(s) you are assigned to. This Filter may not be the most useful to you. For example, if you are only responsible for a set of Vendors, you can create a filter for just these Vendors and make that your Default Filter. This means that every time you open the Calendar, it will be opened filtered to just the list of Vendors you are responsible for.
- To set your Default Filter, first open the Calendar.
- Click on the Magnifying Glass icon next to the right of the Filter you want to set as your Default

- This will open the same popup where you created your Saved Filter with all of the Settings you already defined. To make the filter your Default Filter, check the Default Filter Check Box and then Click on the Save and Apply button at the bottom of the popup.
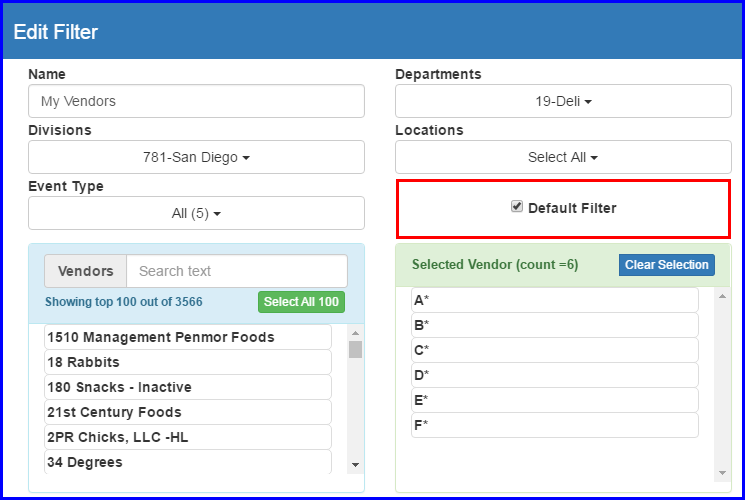
- You will be returned to the Calendar. Your Default Filter will now have (Default) added as part of the name.

- To switch Default Filters, simply open a different Filter in Edit Mode and check the Default Filter check box. When you save your changes, the Default Filter will be switched to the new filter you selected
- To set the Default Filter back to your default Divsion(s) and Department(s), simply open the current Default Filter in Edit Mode and uncheck the Default Filter check box and save your changes. When no Default Filter is selected among your Saved Filters, the Portal automatically goes back to using your default Division(s) and Department(s)
What’s New?
From now on, when there is a new Buyer Portal Release, a What’s New popup will open on top of the Home Page the first time the User logins to the new version. The What’s New popup will have simple instructions on how to use the new features in the Release. You may need to scroll down in order to see ALL of the Release Notes. Release Notes will be store historically. If you need to view the Release Notes after the first time you login to the new Release, they can be found by going to the Help Menu and selecting What’s New? This will open a new window in your Browser with links to view the Release Notes. This functionality is optimized to work with your Mobile Device. 
Various Bug Fixes
- In Calendar, sort Items as Numbers instead of Text in the Item Filter so that Item# 100,000 comes after Item# 2,000.
- Calendar overflows the width of the page in Mobile View
- Updated Mobile UI for Event Feedback on the Dashboard to make it readable
- Added Enhancements to DPIS tab on Event Popup
- Fixed Calendar control on Event Feedback Report page
- Remove references to Spanish Language option which does not currently exist