Buyer Portal v1.6.0a: Add/Edit Events
Adding New Event Requests 
Adding New Event Requests can be done on both your Computer and your Mobile Devices. The process on your Mobile Device will be slightly different as the process flow has been broken up in to a Wizard that walks you through the Scheduling process step by step. The Mobile Device flow will covered in a later section.
Adding Event Requests on your Computer
To add a new Event Request on your Computer, follow these steps:
- Click on Add Event from the Menu Bar
- On the first page you will need to select Locations, Dates, and the Items you want to Schedule. If you are responsible for more than one Division, you will first need to select which Division you are Scheduling for since this will drive the list of Locations available for you to select. If you are responsible for a single Division, it will appear in green at the top of the page to indicate that it has already been pre-selected for you
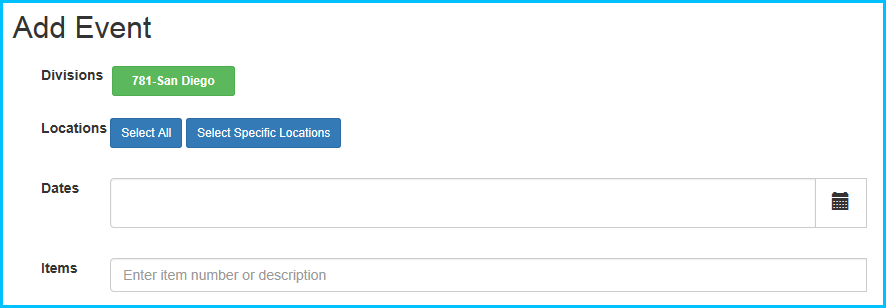
Add Event Requests – Selecting Locations
- There are several different methods for adding Locations to your Event Request. As indicated above, Location selection is drive by the Division selection. You can then either click on the Select All or Select Specific Locations.
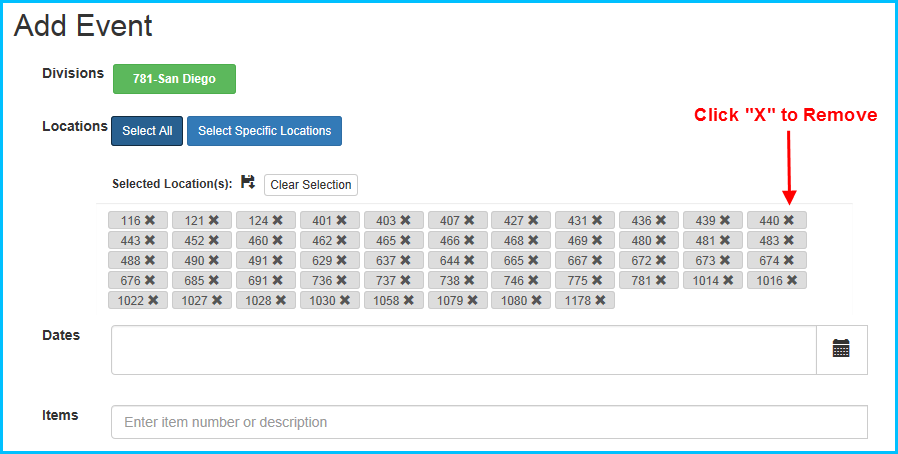
- Select All – Click on the Select All button. All Locations within the Division will be added below. You can then remove individual locations by clicking on the “X” to the right of the Location Number. If you accidentally remove a Location, you can easily add it again by clicking on Select All again (if you haven’t removed other Locations as well) or by clicking on Select Specific Locations (see instructions below).
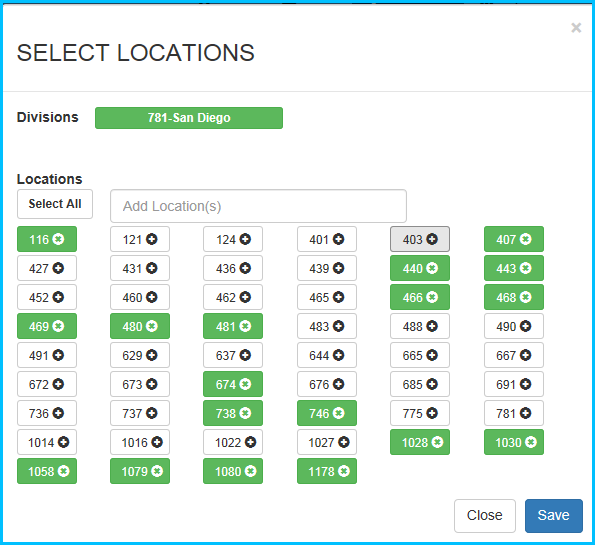
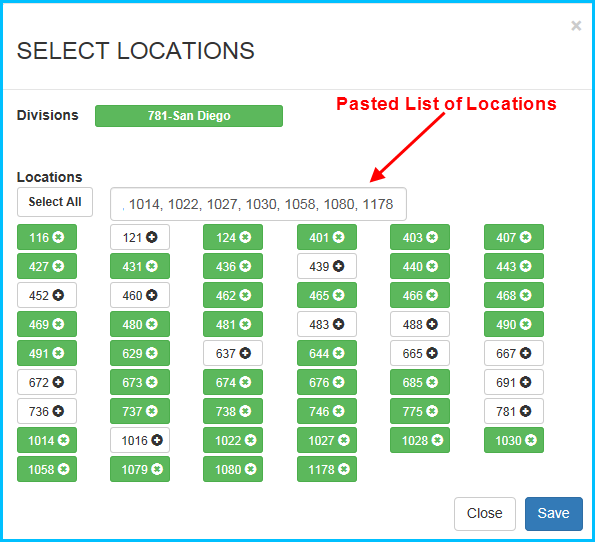
- Select Specific Locations – Click on the Select Specific Locations button to select a group of Locations. This will open a popup where you can select individual Locations. Green indicates that a Location has been selected. Clicking on it again will unselect the Location and change it back to white. Once you have made your selection, make sure to select the Save button at the bottom to save your selection, close the popup, and return to the Add Event Request Page.
- Select Specific Locations – Copy/Paste – You can also Copy and Paste a comma separated list of Locations as a way to add your Locations. To do this, first click on the Select Specific Locations button. Copy and Paste your comma separated list of Locations in to the Add Locations box in the popup. Invalid or duplicate Locations will not be added. Make sure to select the Save button at the bottom to save your selection, close the popup, and return to the Add Event Request Page.
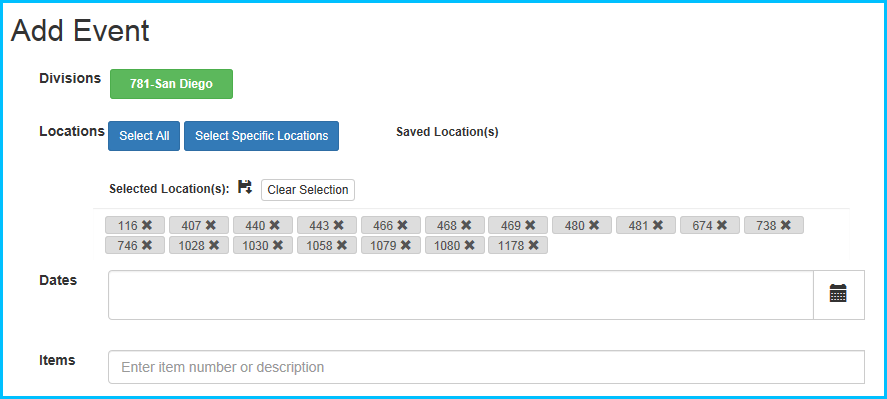
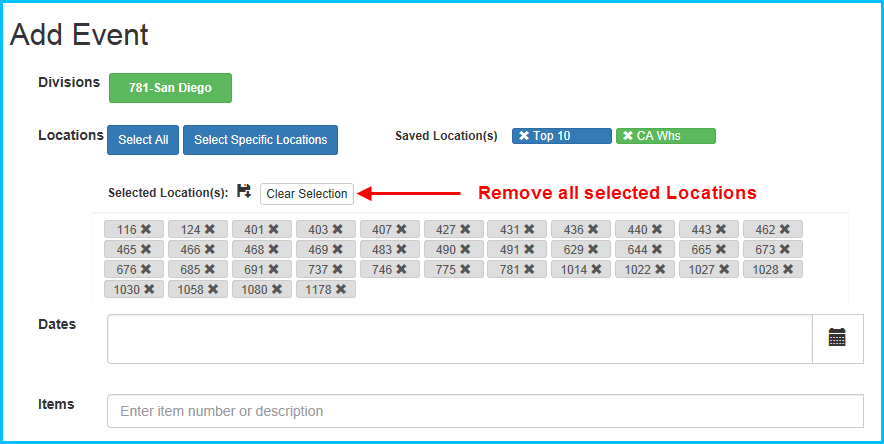
- Select Specific Locations – Saved Filter – You can also Save lists of Locations as Filters that can be reused with a single click in the future. To Save any list of Locations, click on the Save Icon next to Selected Locations on the Add Event Request Page. You will be prompted to give your filter a name. For example you might save a Filter for Top 10 Warehouses, California Warehouses, etc. Once you have saved Filters, they will be displayed as blue buttons next to Saved Locations on the Add Event Request page. All you have to do to use a Saved Filter is to click on it. When you click on it, the saved Locations will be added and the Filter button will be green to indicate it has been selected.

- Remove Locations – If, in the process of adding/removing Locations from your Event Request it would be easier to start over, you can remove all of the selected Locations by clicking on the Clear Selection button. You can then use any of the methods above to add the Locations that you need.
Add Event Request – Add Dates
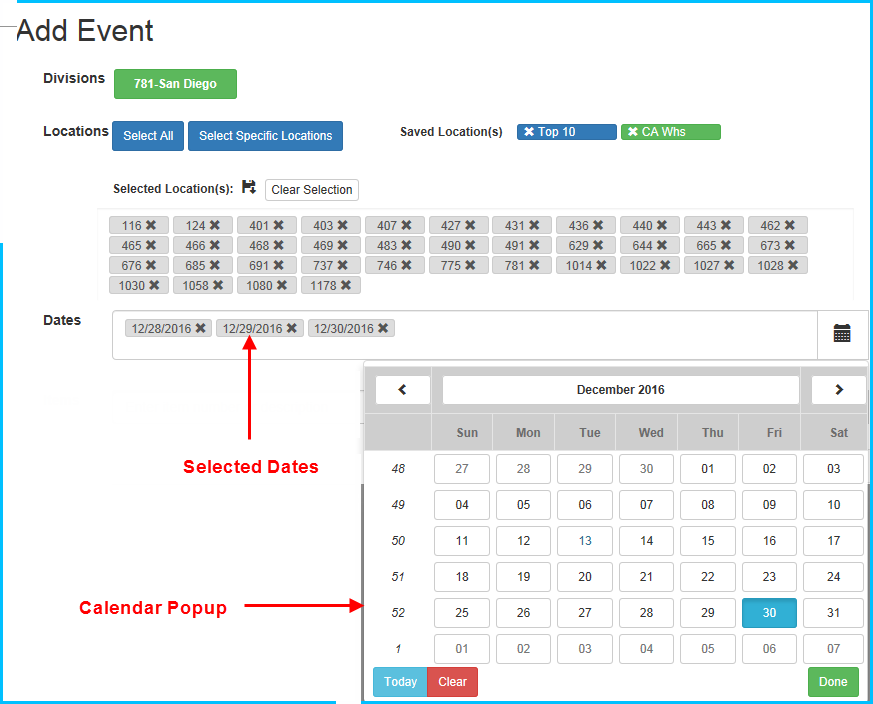
Once you have selected your Locations where you want your Events to run, you will need to select which Dates you want your Events to run on.
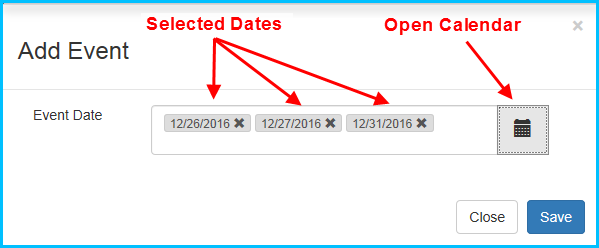
- To Add Dates, click on the Calendar Icon in the Dates section. This will open up a popup Calendar control where you can select your Dates by clicking on them. When you are finished, click on the Done button at the bottom right of the popup. The Dates you selected will be displayed in the Dates section on the Add Event Request page. Similar to the Locations, you can remove Dates by simply clicking on the “X” on the Date. Any Date that has been Removed can be added back again with the Calendar popup.
Add Event Request – Add Items
Once you have selected your Locations and Dates, you will need to add your Items.
Rules for Adding Items
- At least one Item in your Request must be from your Department
- At least one Item in your Request must have a PO Number
- You can schedule Splits with Items from other Departments. These will be verified by the Daymon Sales & Scheduling Team after your Request has been submitted. You do not need to Submit a PO Number for Items that are not from your Department (unless you know what it is).
Adding a Single Item
- To Add and Item, click in to the Item box and start typing. The system will automatically start filtering Items by either the Item Number or Description.

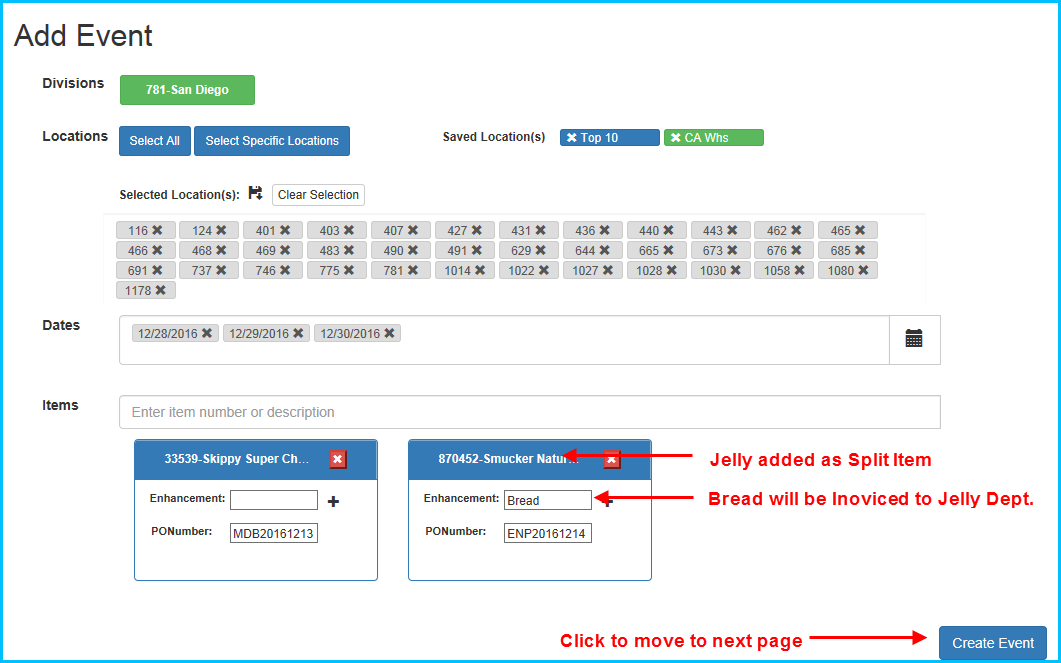
- Once you have selected an Item, it will appear in a box below the Item search box. Similar to Locations and Dates, to remove an Item, click on the red “X” in the top right of the box.
- For every Item added, you can add Enhancements and a PO Number. To add an Enhancement, click in to the Enhancement and type in the Description of the Enhancement you want to use. To add more than one Enhancement, simply click on the “+“ next to the Enhancement field. Similar to Locations and Dates, to remove an Enhancement, click on the “X” next to it to remove it. Once you have added your Items and/or Enhancements and/or PO Number, the Create Event button will become active at the bottom right hand corner of the page. Click on the Create Event button to go to the next step.

Adding Multiple Items
- Follow the same instructions for Adding a Single Item above. Repeat to add as many Items as you need in your Event Request. Please also refer to the Rules for Adding Items. At least one Item must be from your Department and at least one PO Number is required in the submission. If you are doing a Split with an Item from another Department and there is an Enhancement, the cost of the Enhancement will go the Item where the Enhancement has been added. This may change after verification of the Request by the Daymon Sales & Scheduling Team. Once you have added your Items and/or Enhancements and/or PO Number, the Create Event button will become active at the bottom right hand corner of the page. Click on the Create Event button to go to the next step.
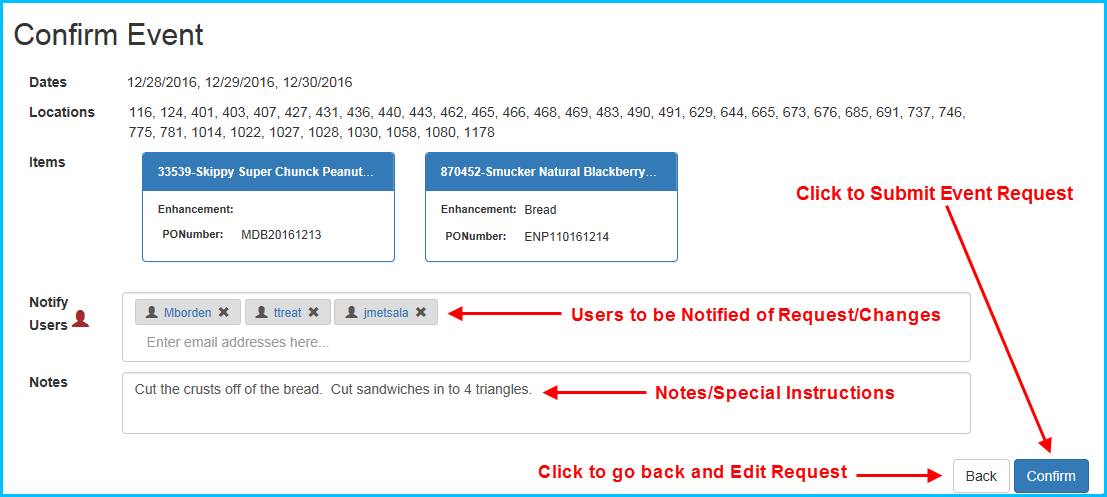
Confirm Events
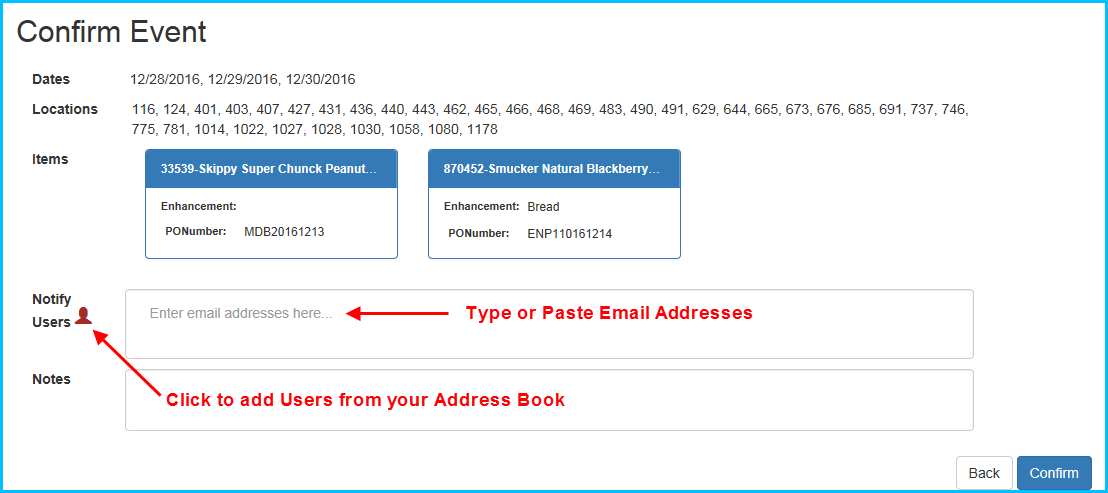
After you click on the Create Event button, you will go to a new Confirm Events page that shows all of the Locations, Dates, Items, Enhancements, and PO Numbers that you entered on the previous page. In addition, there are 2 additional fields you can fill out that are NOT required in order to submit your Event Request
Confirm Events – Notify Users
The Notify Users section is where you can add a list of Email Addresses for the people you want to be notified about the Creation and/or Changes to the Event Request. The Daymon Sales & Scheduling Team for your Region will already receive email updates for your Event Request, so there is no need to enter them. However, you may want to add your Buyer, Assistant Buyer, ICS, Vendor(s), etc. to keep them informed about the Event Request. There are a number of ways to add Users to Notify:
- You can type Email Addresses directly in to the Notify Users space
- You can Copy/Paste Email Addresses in to the Notify Users space (one at a time)
- You can add Users you have previously added to your Address Book by clicking on the User Icon next to Notify Users (see further instructions below)
Confirm Events – Using the Address Book
The Address Book here is not tied to your any of your Email Applications or Contacts in your Computer or Phone. It is simply a place where you can store email addresses for future use for Notifying Users so you do not have to reenter them for each new Request you submit. You can Add Existing Users to your Request, Add/Save New Users to the Address Book, or Remove Existing Users from the Address Book as follows:
- Click on the User Icon next to Notify Users on the Confirm Event Page (see above) to open the Address Book popup.
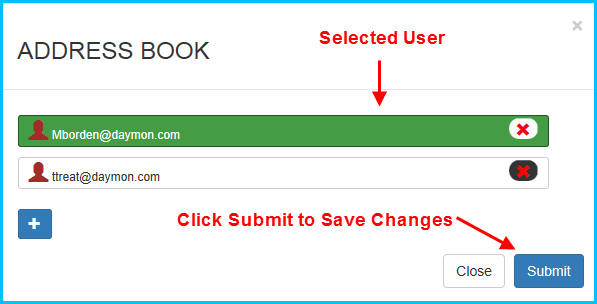
Add Remove/Existing Users to your Event Request
- Click on any of the Existing Users in your Address Book that you want to add. Like other places in the App, the User will turn green when it has been selected. To remove a selected User, simply click it again. The User will change from green to white to indicate it has been deselected.
- Click on the blue Submit button in the bottom right of the popup to Save your changes.
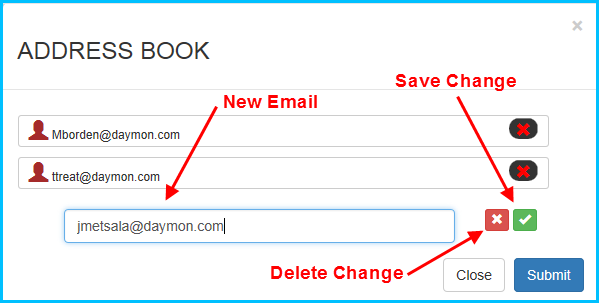
Add New User to Address Book
- To Add a New User to your Address Book, click on the blue “+” below the last entry in your Address Book. This will create a new line where you can an additional Email Address.
- After you enter in the new Email Address, click on green check mark to Save or click on the red x to delete the Email Address you just Added.
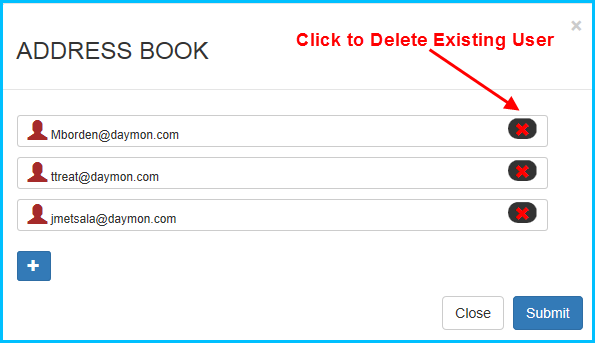
Remove Existing User from Address Book
- To Remove an Existing User from your Address Book, click on the red “X” all the way to the right of the Users Email Address.
Confirm Events – Add Notes
The last, optional, step is to type in any Notes or Special Instructions you have for your Event Request. The Daymon Sales & Scheduling Team will see these Notes when processing your Event Request.
Confirm Event Request
Now that you have filled out all of the Required (and maybe some of the Optional) Fields, you can Submit your Event Request by clicking on the blue Submit button in the bottom right hand corner. If, for whatever reason, you need to make changes to your Locations, Dates, Items, Enhancements, or PO Numbers, click on the white Back button instead to go back to the Event Request page to make changes.
Once you click Submit, your Request will be sent to the Daymon Sales & Scheduling Team, you will receive a Confirmation Email with the details of your Request, and you will be returned to the Home Page of the Portal.
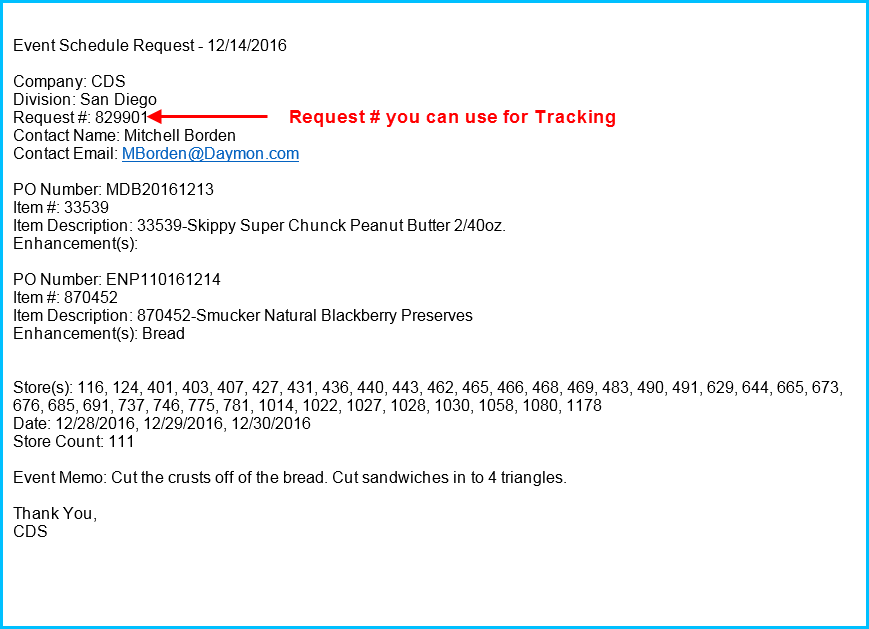
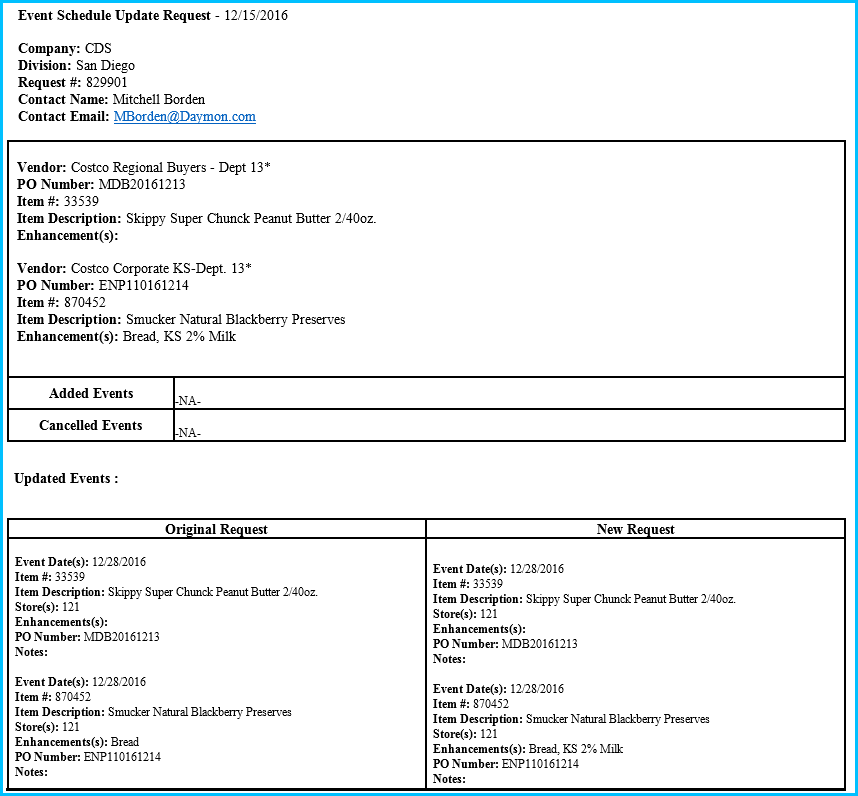
Event Request Confirmation Email
After you Submit your Event Request, you, and all of the Users you selected to be notified, will receive a Confirmation Email from the System that includes all of the details about your Request. This includes the Request # that you can use for tracking purposes throughout the life of the Event Request. Below is a sample of the Confirmation Email
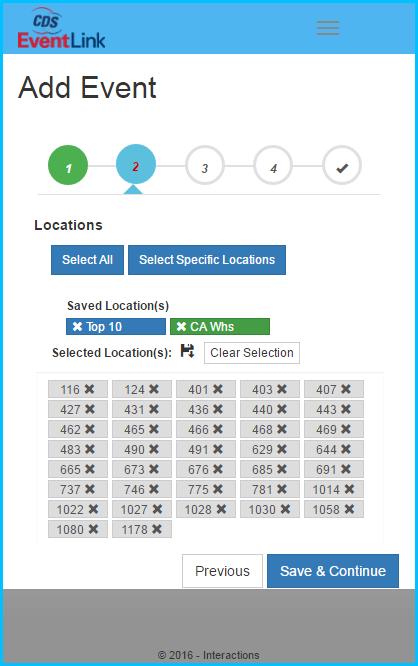
Adding Event Requests with your Mobile Device
The process for Adding Event Requests on your Phone follows the same exact process as outlined above. The only difference is, to optimize the process on your phone, the Add Event Request is broken up in to a 4 step Wizard that walks you through the process.
Add Locations
Add Dates

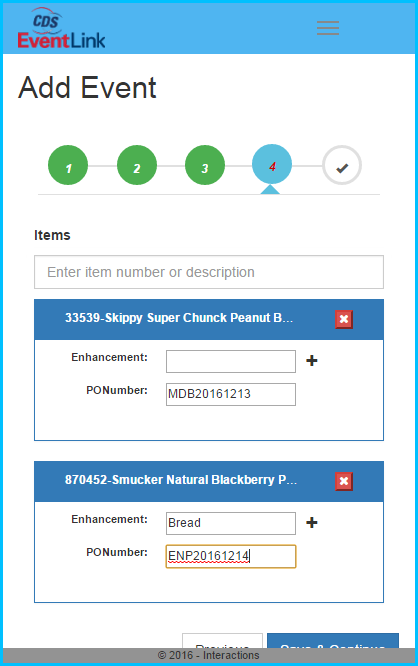
Add Items, Enhancements, and PO Numbers
Add Users to Notify, Notes

Calendar – View Event Requests
To give you a more complete view of the upcoming Schedule, we have added Event Requests to the Calendar View in Buyer Portal. Event Requests are Requests that have been submitted either by Buyers or Vendors through their respective Portals that have not been finalized by the Daymon Sales & Scheduling Team yet. These Requests are Waiting Approval (for the most part, exceptions will be covered in a later section) and not actually on the Schedule yet. The Daymon Sales & Scheduling team may have to make updates to the Request (changing Dates and/or Locations) or have questions about the Request that must be resolved prior to the Request actually being Scheduled.
Calendar View – Finding Event Requests
To help identify Event Requests on the Calendar, they are color coded as Gray (to signify they are not complete yet). They may still be Regular, Combos, Splits, etc., but until they are Approved by the Daymon Sales & Scheduling Team, ALL Event Types will show as Gray.
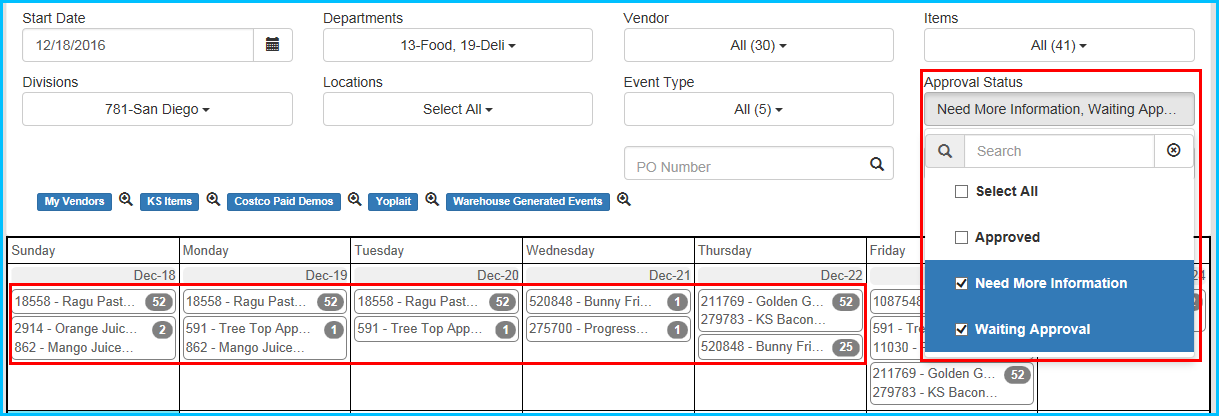
To help find Event Requests on the Calendar, we have added three new filters:
- Approval Status – This indicates where the Events in the Event Request process are. Events can be Approved (i.e. on the Schedule and show normally as Regular, Combos, Splits, etc.), Waiting Approval (in the queue for the Daymon Sales & Scheduling to review), or Needs More Information (meaning the Daymon Sales & Scheduling Team have reviewed the Request, but have questions that have to be answered by the Vendor or Buyer before the Request can be Approved).
- PO Number – You can search by PO Number. This will show all Events within the Time Period and other filters that you have set with the PO Number. Like other text filters in the Calendar, results on the Calendar will update as you type. When I type in just MDB in the filter, I get ALL Events with a PO Number that starts with MDB. Please note that filtering by PO Number works for ALL Events not just Event Requests.

- Request Number – You can search by Request Number. This is the Tracking number the System emails to you when you Submit an Event Request through the Portal. This will show all Events within the Time Period and other filter that you have set with the Request Number. Please note that filtering by PO Number works for ALL Events not just Event Requests.
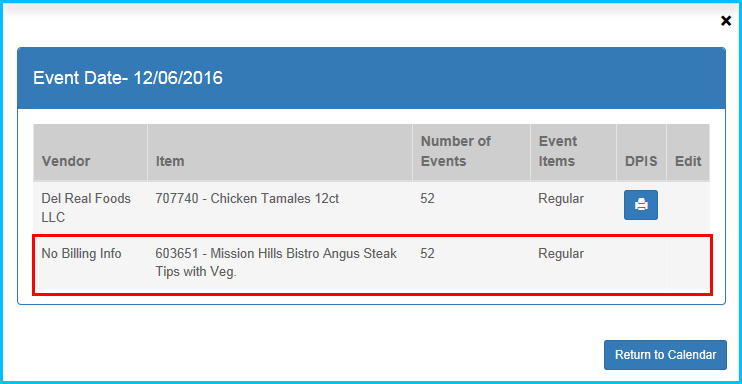
Calendar – View Event Requests in Today’s Events
When you open up Today’s Events by clicking on a Date in the Calendar, Event Requests will sometimes be missing some information depending on where they are in the Approval Process. For example, when a Buyer submits an Event, the Billable Vendor does not get assigned until the Daymon Sales & Scheduling Team reviews and processes the Request. This is also when the DPIS would be assigned. This means that until the Event Request has been processed, this data will be missing.
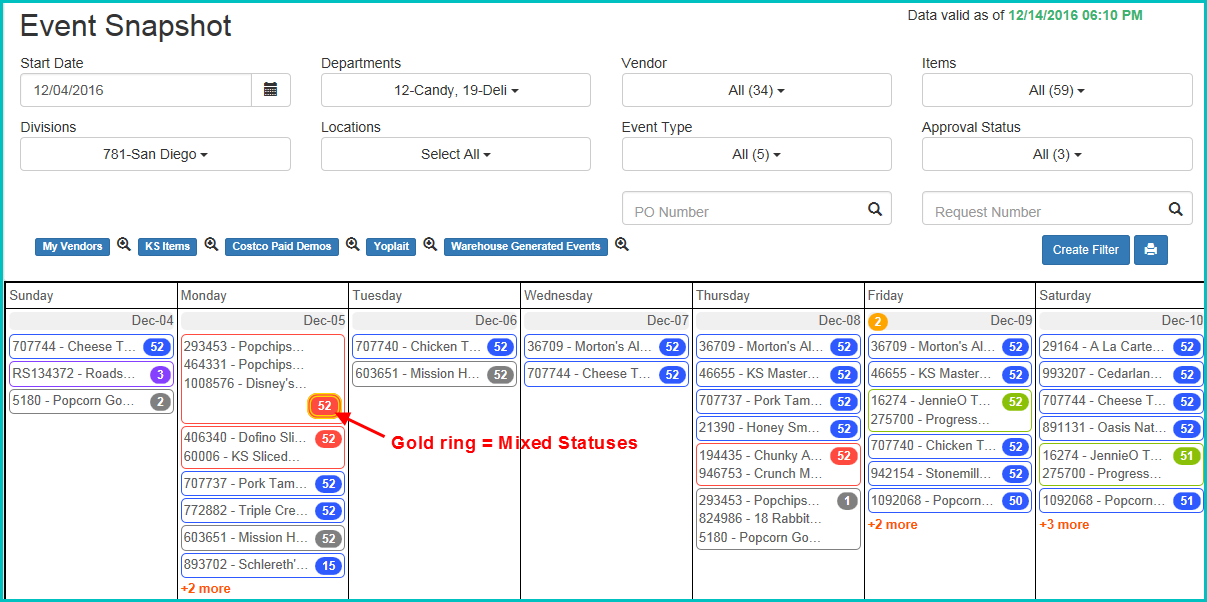
Calendar – Mixed Approval Statuses
On some occasions, and Event Request may have Events that are in multiple Approval Statuses. Some may be Approved, some may be Waiting Approval, and some may Need More Information. This can happen for a number of reasons. For example, you may add Dates/Locations to an existing Request that has already been approved. The Events that had already been Approved would remain Approved, but the newly added Events would be in Waiting Approval. In the Calendar, it is difficult to show 2 Approval Statuses at the same time. What we have done to indicate when a group of Events have mixed Approval Statuses, we have added a gold ring around the Event Count in the Calendar. The Color of the Event Count will be dictated by the highest Approval Status in the group of Events. For example, If I had a set of Regular Events where there was 1 Approved Event and 1 Waiting Approval Event, the Event Count would be 2 and the Color would Blue with Gold ring around it. In the same scenario, if 1 Event was Waiting Approval and 1 Event was Needs More Information, the Event Count would still be 2, but the Color would be Gray with a Gold ring around it. The most important thing to understand is that if your Events have more than 1 Approval Status, you will see the Gold ring and you should open the Event Details to see all of the Events and their Approval Statuses.
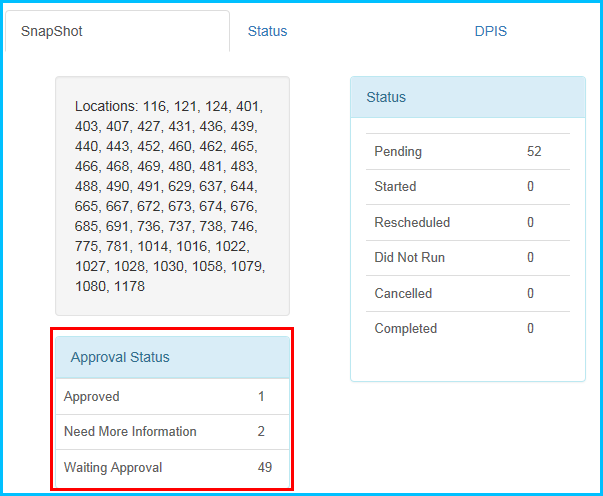
Calendar – View Event Details
To see the Details about a group of Events with Mixed Statuses, click on the Event in the Calendar to open the Event Details popup. In addition to the Execution Statuses, we have added a section for the Approval Statuses on the first tab. If you have Mixed Statuses, the Event Count for each status will show in Approval Status section.
Editing Event Requests 
After an Event Request has been submitted through the Portal, there may be circumstances where you need to Edit the Original Request. There could be any number of reasons including:
- Adding/Removing Locations
- Adding/Removing Dates
- Cancelling Events
- Adding/Removing Enhancements
- Adding/Editing PO Numbers
- Adding/Editing Special Notes/Instructions to the Daymon Sales & Scheduling Team
- Providing Additional Information requested by the Daymon Sales & Scheduling Team
Regardless of the reason, Editing a Request can be done within the Portal, but there are a number of Rules to be aware of:
- To Edit a Request, you must be the person who originally submitted the Request. We do not allow you to Edit a Vendor’s Request any more than we would allow a Vendor to Edit one of your Requests. You will know if a Request is Editable in either Today’s Events or the Event Details popup by the presence of the Edit Icon or Edit Button
- To Edit a Request, it must first be Approved by the Daymon Sales & Scheduling Team. This may sound a little backwards, but when you first submit a Request through the Portal, it is missing a lot of the information that is needed to actually Schedule the Request. This information is added by the Daymon Sales & Scheduling Team as part of their process of Scheduling the Request. Until this additional information is added, the Event Request cannot be edited.
- When Edit a Request, any of the Events effected by the Edit will need to go to the Daymon Sales & Scheduling Team for Approval. This may result in you having Events with Mixed Approval Statuses.
Edit Event Request – Event Details
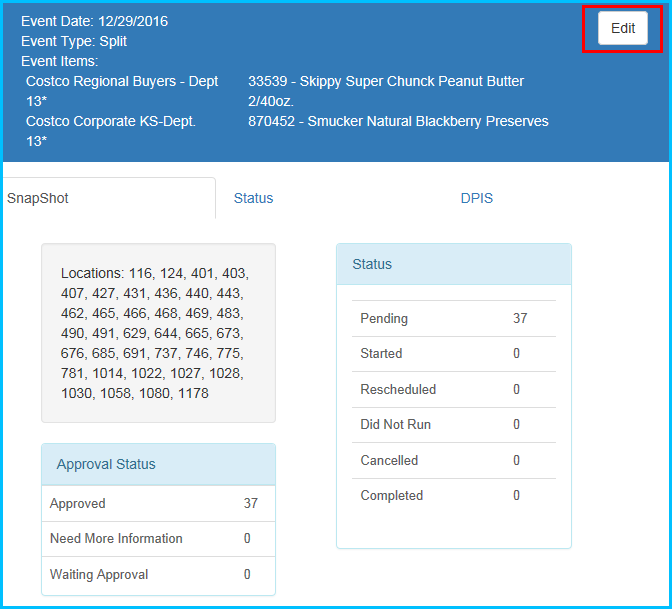
- To Edit an Event Request, open up the Event Details from the Calendar. If the Events meet the Rules above (you created the Event Request and the original Request has been Approved), the Edit button will be active in the top right corner of the popup.
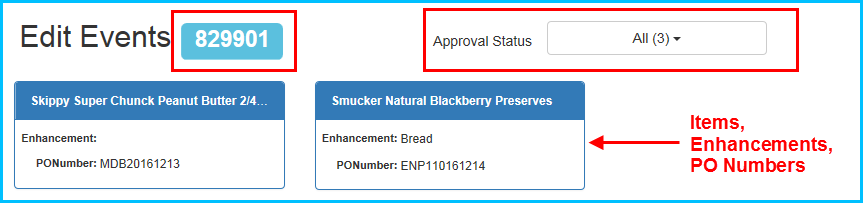
- Click on the Edit button. This will open the Edit Events page. Regardless of which Date you opened the Edit Events page from, you will always see ALL Dates associated with the Request when it is opened.
- The Header section of the Edit Events page shows the Request Number, Items, Enhancements, and PO Numbers. In addition, there is a filter on the page for Approval Status. This filter will be helpful if your Request has Mixed Statuses to help you find the exact Events you are looking for.
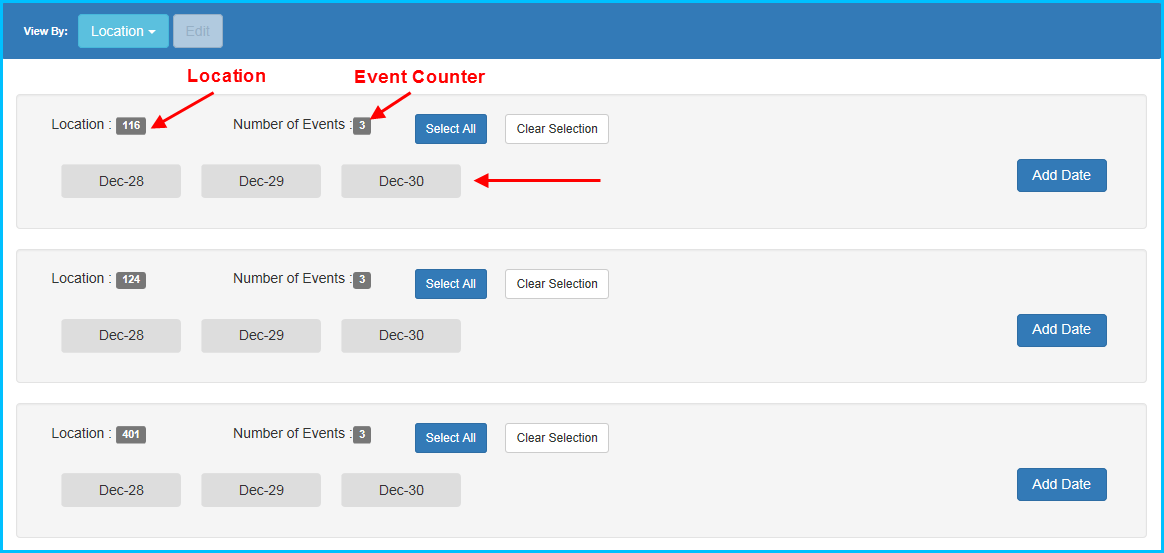
- Below the Edit Events header information are all of the Events associated with the Request grouped either by Date or by Location
Edit Events Grouped by Date

Edit Events Grouped by Location
Adding Locations to a Date
- Toggle Edit Events to the Group by Date View
- If your Request contains more than one date, find the Date that you wish to Add Locations to and click on the Add Location button to open the Edit Event popup. The popup will show all of the Locations in the Division that are eligible to Add to that Date.
- You can then select whichever Locations you would like to add to that specific Date. Similar to Adding Locations when you are you creating a new Request, you can select Locations by clicking on them, pasting a comma separated list in to the Add Locations box, or using the Select All button. Locations that have been selected are changed to green to indicate that they have been selected.
- Once you have selected your Locations, click on the Save button in the bottom right of the popup to Save your changes.

- Once you click on the Save button in the Add Event popup, you will be returned to the Edit Event page. The Locations you just added will be highlighted in orange because they are not yet submitted.
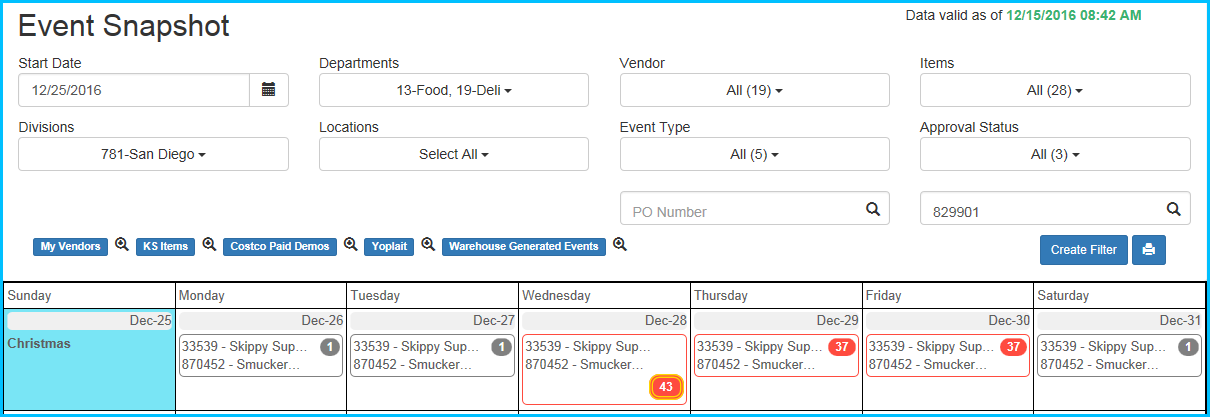
- To Submit your changes, scroll down to the bottom right of the page and click on the green Submit Changes button. You’ll notice in the example below, the Event Counter has gone from 37 Events to 43 Events on 12/28 since I added 6 additional Locations on that day. Once you Submit your changes, the Portal will automatically send you a Confirmation email that outlines all of the changes made to your Request and copy all of the people you originally added to the Notify Users section of your Event Request.

Adding Dates to a Location
- Toggle Edit Events to the Group by Location View
- If your Request contains more than one Location, find the Location that you wish to Add Dates to and click on the Add Dates button to open the Add Event popup.
- Click on the Calendar Icon to select whichever Dates you would like to Add to that specific Location.
- Once you have selected your Dates, click on the Save button in the bottom right of the popup to Save your changes.
- Once you click on the Save button in the Add Event popup, you will be returned to the Edit Event page. The Dates you just added will be highlighted in orange because they are not yet submitted.
- To Submit your changes, scroll down to the bottom right of the page and click on the green Submit Changes button.

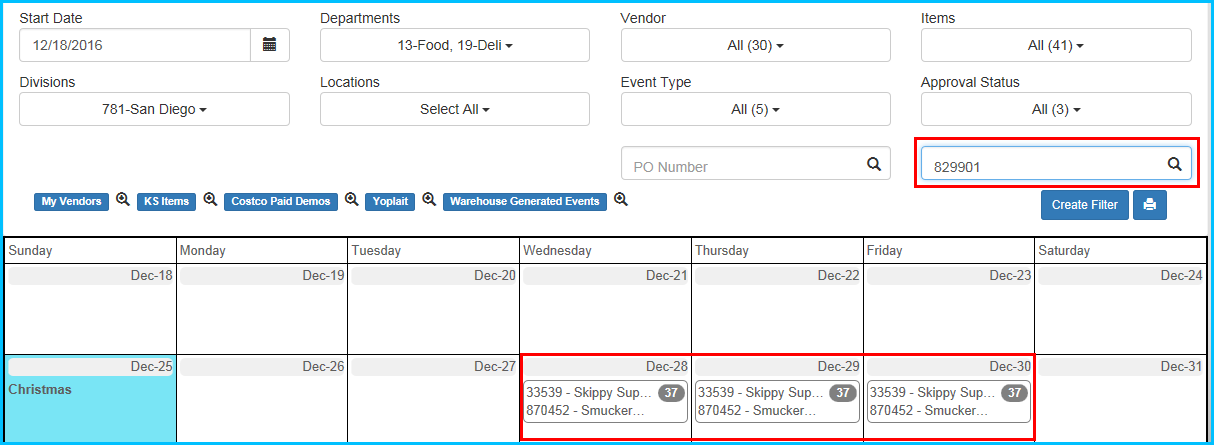
Adding Events – Calendar Updates
Now that I have added some Events by adding Locations to a Date and adding Dates to a Location, when I go back to the Calendar View and filter on my Request Number, the results will reflect the changes just made. My original Event Request had Peanut Butter and Jelly running at 37 warehouses on 12/28, 12/29, and 12/30. The original Request had been Approved, otherwise I would not be able to Edit the Request (see Rules above for Editing Requests). Before adding the Events to my original Request, the Calendar showed these Events on the Calendar as Splits (I selected 2 different Vendors invoice in the back end). Now that I have edited the Request, the Calendar has the following updates:
- 6 Locations were added to 12/28 changing the Event Count from 37 to 43. In addition, there are now Mixed Statuses on 12/28 because the original 37 Events are Approved and 6 newly added Events are Waiting Approval so the Calendar has color coded the Events as Red (Split) with a Gold ring around it to indicate the Mixed Statuses.
- 3 Dates were added to Location 116 for 12/26, 12/27, and 12/31. Since there were no other Events originally scheduled on these Dates, all 3 Dates show an Event Count of 1 color coded gray to indicate that they are Waiting Approval
- No Events were added either by Date or Location to the original 37 Events on 12/28 and 12/29 so the Event Count remains at 37 for these Dates and they are color coded as Red (Splits).
Adding Dates AND Locations at the same time
If you need to Add Dates and Locations at the same time (similar to how you added Dates and Locations when you first created the Event Request), you can do this as follows:
- Open up the Edit Event page.
- Scroll down to the bottom of the page and click on the Add Event button (it is next to the Submit Changes button).
- This will open up a popup where you can add Dates and Locations at the same time. This is helpful if you have to add new Dates to All Locations. Using the same Peanut Butter and Jelly example above, I will add a new weekend of Events at my original 37 Locations. The process of using the Calendar and adding Locations should be familiar at this point.

- As with adding previous Events, the new Events will show up highlighted in orange on the Edit Events page until you click on the Submit button to save your changes.
Edit Events – Bulk Editing Event Rules
The Edit Event functionality in the Portal allows you to multi-select Events to Edit (or Select All) so that you can make Bulk updates to your Requests. When Bulk Editing, there are a few rules to keep in mind:
- The fields that available to be Edited are driven by the Events you have selected. Some fields may not be available based on your selection. For example if I select 2 Events at 116 on 12/26 and 12/27, when I click on the Edit button, I will not have an option to change the Date to 12/23 because that would create duplicate Events at 116 on 12/23 which is not allowed. The same example holds true for the inverse example. If I select 2 Events at 116 and 124 on 12/29, I cannot edit the Location to 121 as this would create duplicate Events at 121 on 12/29. Please keep this in mind when Bulk Editing Events. If you do not see the field you want to edit after you have selected your Events, editing this field would create some sort of duplicate conflict.

Edit Events – Bulk Editing Events
To Bulk Edit Events follow these steps:
- Open the Edit Events page. Remember, this will open up your entire Request to Edit (All Dates, All Locations)
- Select how you want to view your Event Data using the View By drop down to switch between Events Grouped by Date and Events Grouped by Location
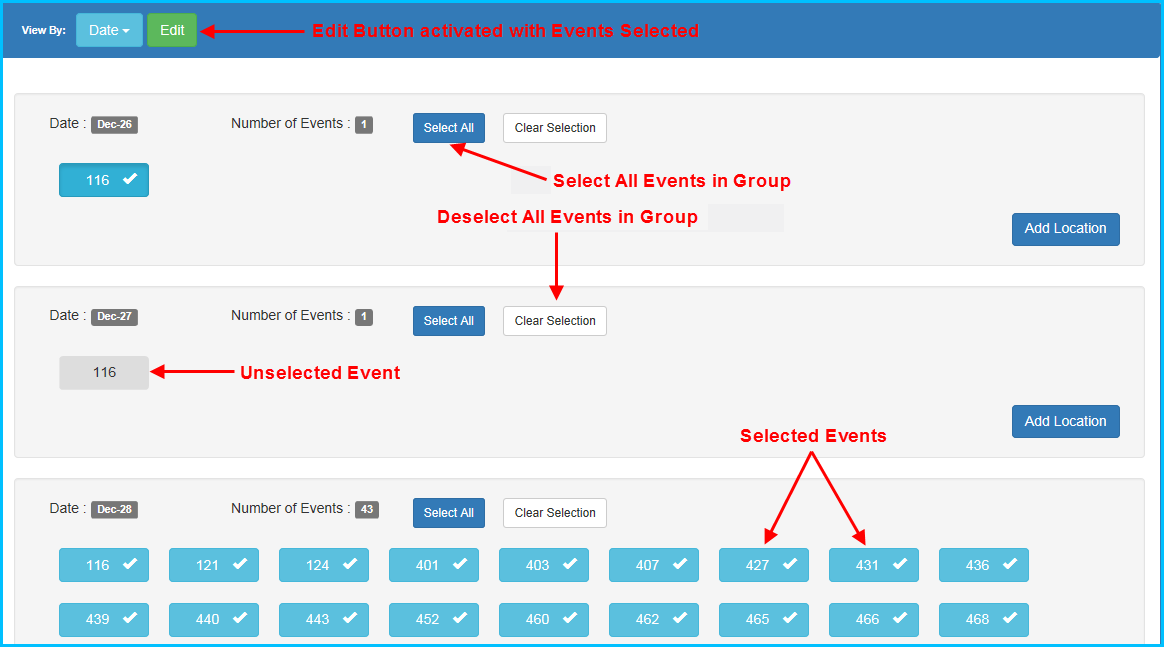
- There are a number of ways to select the Events you want to Edit. You can click on an individual Event to select it. You can continue to click on Events one at a time and they will turn blue with a check mark to show that they have been selected. You can also use the Select All button that is included in each group of Events. Once you have selected at least 1 Event for Editing, you will notice that the Edit button at the top of the section will change to green meaning it can now be clicked to Edit however many Events you have selected.
- To unselect Events, you can click on the individual Events you have already selected and they will change from blue back to gray to show that they have been deselected. You can also use the Clear Selection button next to the Select All button to deselect all of the Events in that group.
- Once you have selected the Events that you want to change, click on the green Edit button at the top of the section. The Edit Event popup. Keep in mind that the Events you have selected will drive which fields are available for Edit in the Edit Event popup (see Rules above).
- In the Edit Event popup you can edit Dates, Locations, Enhancements, PO Numbers, Notes/Instructions, or Cancel the selected Events. For this example, I have selected multiple Locations and multiple dates so those options are not available to Edit (see Rules).
- I am adding and additional Enhancement for KS 2% Milk for just the Events that I have selected.
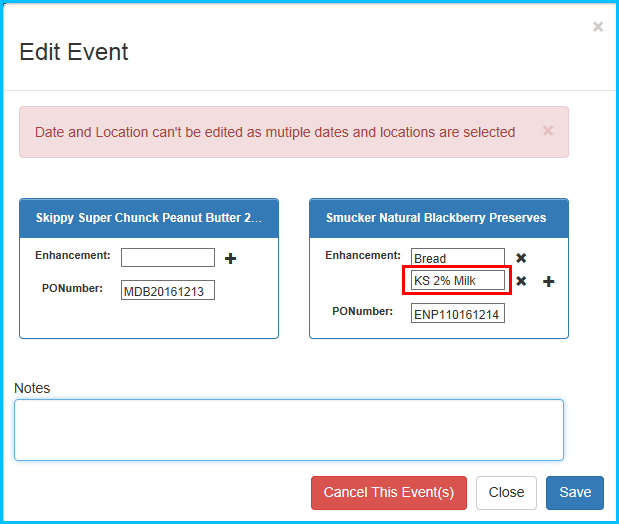
- Once you have made your Edits, click on the blue Save button in the bottom right of the popup. This will return you to the Edit Events page where the Events that you have made Edits to will be highlighted in Orange.
- Scroll to the bottom of the page and click on the green Submit Changes to update your Event Request. After you submit your changes, the Portal will send out an email with a Summary of all of the changes you have submitted to you and all of the people you added to the Notify Users section of the original Event Request. All of the Events you have Edited will be changed back to Waiting Approval until they have been reviewed by the Daymon Sales & Scheduling Team.
Sample Edit Event Confirmation Email
Edit Events – Editing Events that are Waiting Approval or Need More Information
In the Rules about Editing Events, one rule was that before an Event could be edited, it had to be Approved by the Daymon Sales & Scheduling Team. This is only true for when the Request is first submitted. If you remember, the reason why the Request could not be edited was due to the fact that there was data that the Daymon team had to add to the Request in order to complete it in the System. Once this has been completed for a Request, ALL Events in the Request can be edited regardless of what Approval Status they are in.
Edit Events – Finding and/or Editing Events that Need More Information
If the Daymon Sales & Scheduling Team needs more information about an Event (or ALL Events in a Request), the Portal will send you an email with the details. The email will provide the details such as Date, Location, etc. along with the Information being requested by the Daymon team. You can also see and/or update this data in the Edit Event page for the Request as follows:
- Open the Edit Events page for the Request in question.
- If you know the Date and Location of the Event in question, you can click on it to open up the Edit Event popup. If you are not sure or you have multiple Events in Need More Information Status, you can use the Approval Status filter in the Header of the Edit Events page to show ONLY Events that Need More Information
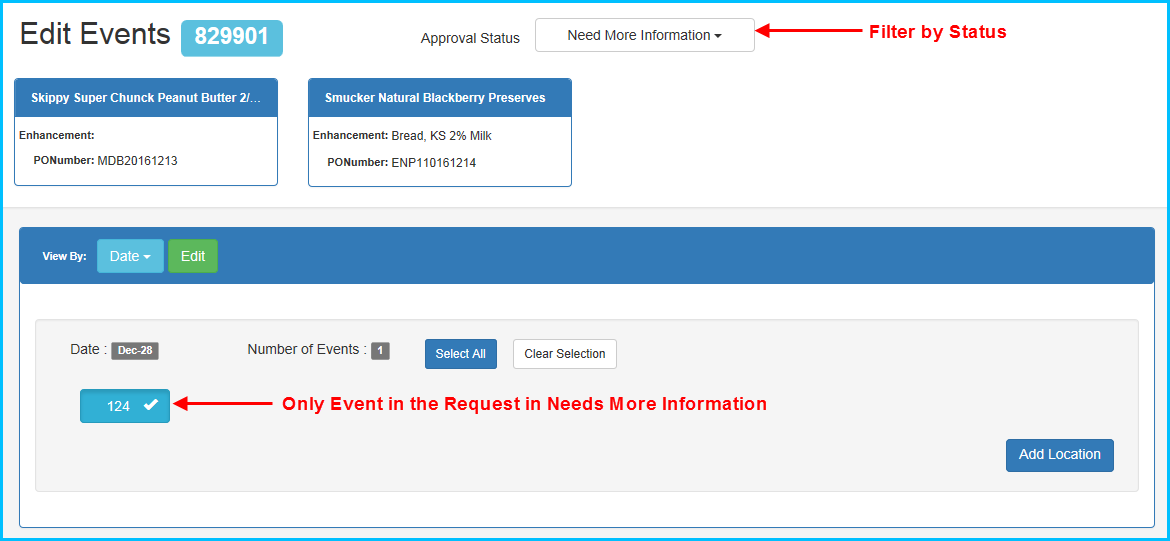
- Click on the green Edit button to open up the Edit Event popup. In the popup you will see a Note from the Daymon Sales & Scheduling Team asking for whatever information they need. In some cases, if the issue is complex, you may need to contact the Daymon Sales & Scheduling team directly to resolve. If it is a simple issue that is easily resolved, you can write a reply in the Notes section in the Edit Event popup to send your answer back to the Daymon Team.
